SPLINTERS
Tennessee Valley Woodworkers
 Vol. 19/ Issue 7
July 2004
Editor: Tom Gillard Jr.

Meeting Notice:
The next meeting of the TN Valley Woodworkers
Will be held, July 19th at 7:00 p.m. in the
Duck River Electric Building, Dechard, TN
All interested woodworkers are invited!


The following people have agreed to serve as contacts for their particular
skills. If you have questions, suggestions for activities, or other
comments relating to these skills, please call these folks. Their
interest is to help the club better serve their area of expertise.
Your participation with them will help them achieve that goal.
Tom Cowan
967-4835 Design
Phil Bishop
967-4626 Finishing
Tom Church 967-4460
Turning Harry
May 962-0215
Carving
Bob Reese
728-7974 Sharpening Ross
Roepke 455-9140 Jointery
Maurice Ryan 962-1555
Health and Safety 
List of Club Officers
President: Ken
Gould
V. President: Barbara
Keen
Secretary: Chuck
Taylor
Treasurer: Henry
Davis
Publicity: Larry
Bowers
Newsletter Editor: Tom Gillard
Jr.
Calendar of Events:
July 24th: Bob Reese's sharpening
workshop
October 23rd: Phil Bishop Carving seminar
December 10th: TVW Christmas Party
SHOW AND TELL
Bob Lowrance displayed carvings that he had started while attending
the John Campbell School. The carvings were of cowboys
and had a lot of intricate detailing.
Harold Hewlegy brought some tools
that he had made. They included a mortising plane, a scraper plane
(blade made from a Datsun leaf spring) and a cabinet scraper. All the holders
were made from cherry.
Maurice Ryan brought pictures of a furniture repair job. He had started
from a “wreck” and the project consisted of rebuilding, repairing, and
refinishing the piece of furniture.
Tom Gillard displayed a cherry
box he had been requested to make. The box is to be used to hold the ashes
of a cremated pet.
Harvey Carter brought a “bear”
chair. This was his beginning woodworking project and was to be built
for a child. The plan was obtained from a magazine and was billed as a
“weekend” project. He told the story of the project lasting for 5 years
and when he was finished, the child had outgrown the chair.
Don Powers brought a piece of chettum
wood mounted on a cherry base. The natural chettum
made an attractive display.
Kenneth Clark brought a walnut
table that he had made and finished with sanding sealer and gloss varnish.
Geoff Roehm showed a picture of his current project. He is installing
a CNC milling machine in his shop to make the intricate fixtures used in
his guitar manufacturing.
Henry Cox brought 3 scroll saw projects with intricate detailed cuts.
He also gave members a tip to keep scroll saws from vibrating so much.
He had made a large box for mounting the scroll saw and filled the box
with sand to reduce the vibration of the saw.
IN REMBRENCE
Bernie Kollstadt
has passed away. Henry will be sending a gift in his name to the Library
in Tullahoma. Roberta's address is 3008 Tara Blvd, Tullahoma,
TN 37388. If you want to send a card.
His daughter has told me more than once that Bernie really enjoyed
the Wood Club. It is a club that he wishes he could have found much
earlier.
Making Sense of Sandpaper
Knowing how it works is the first step in choosing the right abrasive
by Strother Purdy
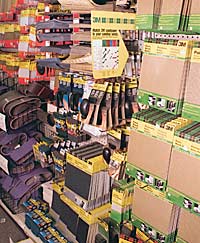
Years ago at a garage sale, I bought a pile of no-name sandpaper for
just pennies a sheet. I got it home. I sanded with it, but nothing came
off the wood. Sanding harder, the grit came off the paper. It didn't even
burn very well in my wood stove.
Sanding is necessary drudge work, improved only by spending less time
doing it. As I learned, you can't go right buying cheap stuff, but it's
still easy to go wrong with the best sandpaper that's available. Not long
ago, for example, I tried to take the finish off some maple flooring. Even
though I was armed with premium-grade, 50-grit aluminum-oxide belts, the
work took far too long. It wasn't that the belts were bad. I was simply
using the wrong abrasive for the job. A 36-grit ceramic belt would have
cut my sanding time substantially.
The key to choosing the right sandpaper is knowing how the many different
kinds of sandpaper work. Each component, not just the grit, contributes
to the sandpaper's performance, determining how quickly it works, how long
it lasts and how smooth the results will be. If you know how the components
work together, you'll be able to choose your sandpaper wisely, and use
it efficiently. Then you won't waste time sanding or end up burning the
stuff in your wood stove.
Sandpaper is a cutting tool
What sandpaper does to wood is really no different from what a saw,
a plane or a chisel does. They all have sharp points or edges that cut
wood fibers. Sandpaper's cutting is simply on a much smaller scale. The
only substantial difference between sandpaper and other cutting tools is
that sandpaper can't be sharpened.
Sandpaper is made of abrasive minerals, adhesive and a cloth, paper
or polyester backing. The abrasive minerals are bonded to the backing by
two coats of adhesive; first the make coat bonds them to the backing; then
the size coat locks them in position.
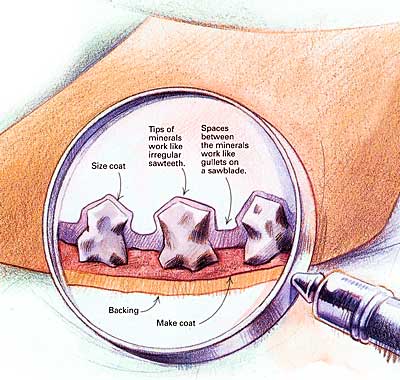 Look at sandpaper
up close, and you'll see that the sharp tips of the abrasive grains look
like small, irregularly shaped sawteeth. The grains are supported
by a cloth or paper backing and two adhesive bonds, much the way that sawteeth
are supported by the sawblade. As sandpaper is pushed across wood, the
abrasive grains dig into the surface and cut out minute shavings, which
are called swarf in industry jargon. To the naked eye, these shavings look
like fine dust. Magnified, they look like the shavings produced by saws
or other cutting tools.
Even the spaces between the abrasive grains serve an important role.
They work the way gullets on sawblades do, giving the shavings a place
to go. This is why sandpaper designed for wood has what's called an open
coat, where only 40% to 70% of the backing is covered with abrasive. The
spaces in an open coat are hard to see in fine grits but are very obvious
in coarse grades.
Closed-coat sandpaper, where the backing is entirely covered with abrasive,
is not appropriate for sanding wood because the swarf has no place to go
and quickly clogs the paper. Closed-coat sandpaper is more appropriate
on other materials such as steel and glass because the particles of swarf
are much smaller.
Some sandpaper is advertised as non-loading, or stearated. These papers
are covered with a substance called zinc stearate -- soap, really -- which
helps keep the sandpaper from clogging with swarf. Stearated papers are
only useful for sanding finishes and resinous woods. Wood resin and most
finishes will become molten from the heat generated by sanding, even hand-sanding.
In this state, these substances are very sticky, and given the chance,
they will firmly glue themselves to the sandpaper. Stearates work by attaching
to the molten swarf, making it slippery, not sticky, and preventing it
from bonding to the sandpaper.
Methods for sanding efficiently
Sanding a rough surface smooth in preparation for a finish seems a
pretty straightforward proposition. For a board fresh out of the planer,
woodworkers know to start with a coarse paper, perhaps 80-grit or 100-grit,
and progress incrementally without skipping a grade up to the finer grits.
At each step, you simply erase the scratches you made previously with finer
and smaller scratches until, at 180-grit or 220-grit, the scratches are
too small to see or feel. But there are a fair number of opinions on how
to do this most efficiently.
Don't skip grits, usually -- Skipping a grit to save time and sandpaper
is a common temptation, but not a good idea when working with hardwoods.
You can remove the scratches left by 120-grit sandpaper with 180-grit,
but it will take you far more work than if you use 150-grit first. You
will also wear out more 180-grit sandpaper, so you don't really save any
materials. When sanding maple, for instance, skipping two grits between
80 and 180 will probably double the total sanding time. This, however,
is not as true with woods such as pine. Soft woods take much less work
overall to sand smooth. Skipping a grit will increase the work negligibly
and may save you some materials.
(The
Taunton Press)
The speaker will be Glenn Lazalier who was Chief Engineering Officer
for Arnold Engineering Development Center support contractor. He
is now retired and one of his hobbies is woodworking. He will talk
about the king-size Walnut sleigh bed he built as a wedding gift for his
daughter. He also has carved delicate miniatures of human and animal
figures. He has crafted many large furniture pieces.
See you on the 20th.
click on the image to go to these sites


 Vol. 19/ Issue 7
July 2004
Editor: Tom Gillard Jr.
![]()
![]()
![]()
![]()
