SPLINTERS
Tennessee Valley Woodworkers
 Vol. 17/ Issue 7
July 2002
Editor: Tom Gillard Jr.

Meeting Notice:
The next meeting of the TN Valley Woodworkers
Will be held, July 16th, at 7:00 p.m. in the
Duck River Electric Building, Dechard, TN
All interested woodworkers are invited!


The following people have agreed to serve as contacts for their particular
skills. If you have questions, suggestions
for activities, or other comments relating to these skills, please
call these folks. Their interest is to help the
club better serve their area of expertise. Your participation
with them will help them achieve that goal.
Alice
Berry 454-3815 Design
Phil Bishop
967-4626 Finishing
Tom
Church 967-4460 Turning
Harry May
962-0215 Carving
Bob
Reese 728-7974 Sharpening
Ross Roepke
455-9140 Joinery
Maurice Ryan 962-1555
Health and Safety
List of
Club Officer
President: Bob Leonard
V. President: Doyle McConnell
Secretary: Barbara Keen
Treasurer: Henry Davis
Publicity: Maurice & Ruth Ryan
Newsletter Editor: Tom Gillard Jr.
GOD BLESS AMERICA!

CALENDAR of EVENTS
Coffee County Fair : 3rd week in September
Fall seminar :October 19
Christmas party: December 6
Dovetail Keys
Perhaps no other joint has more strength or better looks than
a corner joined by through dovetails. But here's a much
simpler joinery process that comes pretty close. With just a
router table and a bare-bones homemade jig, you can
crank out terrific-looking box corners like the one above.
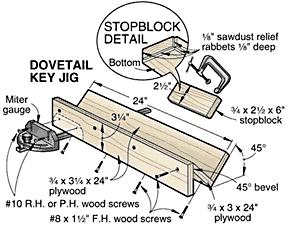
1. The jig above mounts to a miter gauge that slides in the miter slot
of a router table. Built to
the length shown, on most router tables it will handle boxes with sides
up to about 24" wide.
You can tailor the length to better suit your router table and to accommodate
smaller or larger boxes.
The miter slot-to-router bit spacing on your table may affect
the exact placement of the screws.
Be sure to put them where the router bit will not cut into them. (Before
you build this jig, please
read the next step and note.)
2. Mount a dovetail bit in your table-mounted router. We used an 11/16"-diameter
bit with an 8° cutter
angle anda 1/2" shank for the dovetails shown in the 3/4";-thick stock
of the corner. Most dovetail bits
will work, and you may want to consider using smaller bits for thinner
stock. Raise the bit so it will cut
to the correct approximate depth through your workpiece
sitting in the jig.
Mark the location where the shank of the dovetail bit will pass through
the jig in the
following steps. You need to remove the stock in this area of
the jig so the bit can pass through it.
We did so with a dado set as shown above. Make this cut through only
the "V" portion of the jig—do not
cut through the vertical piece that mounts to the miter gauge. You
also could make this cut by sawing
a series of kerfs with a handsaw and chiseling out the waste.
Note: If your table has a plunge router, it may be impossible
to raise the bit high enough to make a
full-depth cut. Also, the shorter shanks on smaller bits may prevent
the bit from cutting high enough.
In that case, you may have to make the jig from 1/2" plywood.
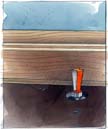
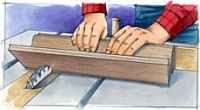
3. Pass the jig through the spinning dovetail bit as shown.
The bit's shank should prevent the bit from passing through the
back side of the jig.
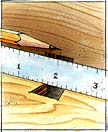
4. Assemble a mitered corner from scrap stock of the same thickness
as the wood used in your box.
Use this test piece to fine-tune the height of the router bit. Then,
on the inside of the "V", mark the
center of the dovetail cut as shown.
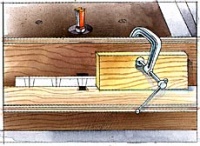
5. On a piece of paper that's as long as your box corners, lay out
the position of the dovetails.
You can space the dovetails evenly or unevenly, but it usually looks
best to have a symmetrical
arrangement. For our box, we put one dovetail in the exact center,
with equal spacing between the dovetails.
The space between the end dovetails and the ends of the corner equal
half of the space between the dovetails.
Mark the dovetail centers.
Position your layout on the inside of the jig's "V" as shown, with
the center of the
right-most dovetail aligned with the center mark on the jig. Position
and clamp the block
at the end of the paper layout.
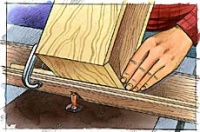
6. Place your box in the jig, butt it against the stop, turn on the
router, and pass the V
portion of the jig through the bit as shown. After making the cut,
lift the workpiece off
the jig and pull the jig back through the bit. Do not leave the box
in the jig when you
pull the jig back—doing so may enlarge the dovetail cut. Make this
cut on each of the
box corners (four total cuts).
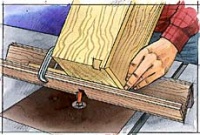
7. Rotate the box 180° so its bottom faces in the opposite direction
it faced in the
previous step. Butt the box against the stop, and again cut each of
the four corners.
Rotating the box in this fashion ensures symmetrical spacing. Move
the clamped
stopblock as necessary to make the remaining cuts.
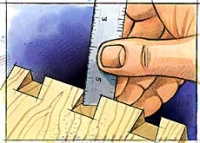
8. Measure the depth of the dovetail cuts as shown. Your dovetail key
stock should be
1/16" thicker than the depth of the dovetail cut. Rip this stock so
it's 1/16"; wider than
the widest part of the dovetail cut.
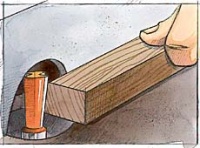
9. Using the same dovetail bit as before, adjust it 1/16"; higher than
the thickness of
your dovetail-key stock. Adjust the fence on your router table so the
bit just barely cuts
into the key stock at table height as shown.
Pass the stock through the bit. At the end of the cut you will get
a small amount of
snipe—you'll cut this off later.
10. Rotate the key stock end for end, keeping the same face down. Cut
the other edge.
Test the fit of this stock in the dovetail cuts. (Slide the unsniped
portion of the stock
into the dovetail cut.) The stock should be slightly too wide. Adjust
the fence forward
just a hair and recut the stock. Do this until the stock fits tightly
in the dovetail cuts. Cut
off the sniped ends.
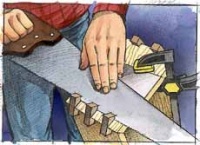
11. Cut the key stock into lengths about 1/4" longer than the dovetail
cuts. Apply glue
to the dovetail cuts and slide the keys into them, leaving about 1/8"
extra key length at
both ends of the dovetail cuts.
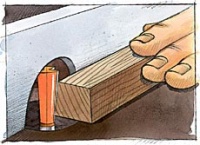
After the glue sets, saw off the excess key stock. A special flush-cutting
handsaw works
well, or you can use a typical handsaw if you protect the box with
a sheet of card stock
as shown.
FOR SALE
The following Craftsman tools;
12 in. Drill Press $130.00
10 in. Table Saw $250.00
Wood Shaper $175.00
14 Shaper Cutters $100.00
12 in. Bandsaw $200.00
Central Machinery 8 in. grinder $75.00
Contact Henry Davis
or at: 393-3191
July Meeting Program
Sherwin Williams, representative John Carter from McMinnville will be
presenting the program on July 16, for the Tennessee Valley Woodworker
Club. The subject will be the chemical coatings used in wood finishing.
The Fall Seminar on Joinery
will be held at Dean and Andy's shop on October
19. Ken Gould has agreed to serve as Chairman, with Bob Lowrance
and Steve Shores as Committee Members. The presenters will come from the
membership.
Bur Oak
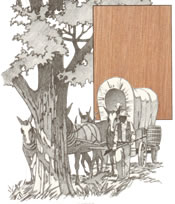
A Tree No Longer
Than Its Roots
Were it not for the bur oak, pioneers in the Midwest would have been greeted by nothing but waving prairie
grass. Instead, they also were welcomed by invitingly open groves of wide-spaced
trees. Beneath the trees' dropping boughs grew a soft greencarpet. What a relief from
the East's tangled forest! Yet, little did the pioneers know of the great battleground
they had entered.
Botanists now understand that the bur oak—called that because of the
fuzzy cap on its acorn—was in constant combat with the tall prairie grass.
In periods of dryness, the grass advanced. When it was wet, the forest
gained, led by the bur oak.
Prairie fires, too, kept the oaks at bay. Then, with settlement, came cattle
to pack down the soil so acorns had trouble sprouting. Livestock also ate
the young seedlings' leaves. Yet, the bur oak survived due to its
remarkable roots.
If you were to somehow peer beneath the ground under a bur oak, you'd
discover a vast system. A relatively short taproot soon turns to a
spreading maze of thick, horizontal roots. Each of the horizontals sends
capillary roots down and up until the size of the entire growth below ground
equals that of the tree above! Such a root system rises to penetrate even
the deep-rooted prairie grasses to catch the slightest rainfall and remain
in
competition. In fact, the bur oak's prime competitor is another bur oak.
That's why they always grow some distance apart—the diameter of each
tree's roots determining their closeness.
NAME TAGS
The subject of name tags came up at the last meeting. Our name tags
were made by K&S TROPHIES , 510 Country Club Drive , Tullahoma.
They were about $5.00 including tax the last time we checked. When in Tullahoma
you can go by and have one made. The tags are 1" x 3" with white letters
on a blue background. Just tell the folks that you want a Tennessee Valley
Woodworkers name tag. If you are never in Tullahoma, Henry Davis will be
happy to take care of it for you, see him at the meeting or give
him a call at 393 - 3191.
Mini Lathe Give Away.
To show our appreciation to our loyal and faithful members your Executive
Committee has again this year decided to give a prize to one lucky member.
To be eligible to win the lathe just sign the drawing register at each
regular club meeting that you attend between now and December. That means
that if you attended the January meeting and attend every meeting from
now through November your name will be in the drawing 11 times.


WEB
SITES of INTEREST
Scott
Phillips Video Help sessions
Arrowmont
School of Arts and Craft
Loyd
Ackerman's Page
WOOD
ONLINE newsletter
Falls Mill
Appalachain
Center for the Arts
Forest
Products Lab. 1999 Wood Handbook
Woodworker's
Journal
WOOD
Online TVWW page
Kevin's Woodturnings
The Oldham Company
The Woodworker's Choice
Russell Brown's Web Page


Saw Blade Sharpening Services: Branching Out is now offering their
services as a drop off spot to have your saw blades sharpened. The
blades will be picked up (Tuesdays), sharpened, and dropped back off at
Branching Out. The Leitz Tooling Systems out of Collierville, TN
will do the sharpening. Call (393-0525) or stop by for details.

10 % OFF Fine Woodworking
Books from Taunton Press
…We’re open Monday thru Saturday
Webmaster:
Tom Gillard Jr.

 Vol. 17/ Issue 7
July 2002
Editor: Tom Gillard Jr.
![]()
![]()
![]()


