SPLINTERS
Tennessee Valley Woodworkers
 Vol. 16/ Issue5
May 2001
Editor: Tom Gillard Jr.

Meeting Notice:
The next meeting of the TN Valley Woodworkers
Will be held, May 15 at 7:00 p.m. in the
Duck River Electric Building, Decherd, TN
All interested woodworkers are invited!


The following people have agreed to serve as contacts for their particular
skills. If you have questions, suggestions
for activities, or other comments relating to these skills, please
call these folks. Their interest is to help the
club better serve their area of expertise. Your participation
with them will help them achieve that goal.
Alice Berry 454-3815 Design
Phil Bishop 967-4626
Finishing
Tom Church 967-4460 Turning
Harry May 962-0215
Carving
Bob Reese 728-7974 Sharpening
Jim Van Cleave 455-8150 Joinery
Maurice Ryan 962-1555 Health and Safety

Calendar of Events
Event
Date
Spring Workshops
TBD
Spring Seminar
4-21
Turning "bee"
5/12
Summer Picnic
6/23
Fall Seminar
TBD
Coffee County Fair
9/20-22
Christmas Party
12/7
Specific problem areas and how to deal with them
By now, you should have a good general understanding of wood movement
and how to deal with it. Here are some tips for handling especially tricky
situations.
STRATEGY 14: Solid-wood tabletops can grow 1/2" or more across their
width, so rigidly fastening such a top to its supporting apron can cause
all sorts of problems. For example, if you attach a tabletop to its apron
with screws only, one of three things probably will happen. Most likely
the tabletop will split along its grain or a joint line, but it may bow
upwards in its center. Or, the tabletop will force the apron to bow outward.
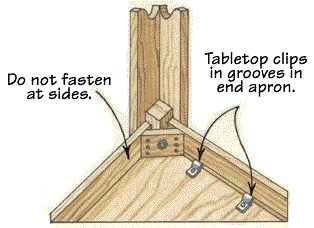
To prevent such mishaps, attach your tabletop with shop-made wooden
clips or commercially available steel versions like those shown below.
The clips will hold the top down, and they also move with the wood and
slide along grooves that you saw into the inside faces of the table aprons.
Fasten the clips where the tabletop meets the supports that run perpendicular
to the tabletop grain (the end aprons and center brace). Do not fasten
the clips to the table where it meets apron pieces that run parallel to
the grain.
STRATEGY 15: To help keep a solid-wood tabletop flat, while also hiding
its end grain, you can add "breadboard ends" to the top. These consist
of two boards, of the same species and thickness as the top, that have
a tongue along one edge. The tongue goes into a groove that runs along
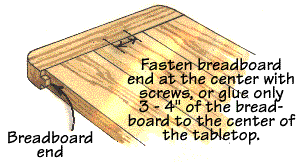
the length of each end of the table. The trick, of course, is fastening
the breadboard ends to the table while allowing the table to move. To do
this, machine the groove and tenon for a tight fit. Then, apply glue to
just the center 3" or 4" of the tenon and groove, and press the breadboard
end into position. The ends will stay in place and the tabletop will move
on both sides of the glued area.
 If you are making the breadboard ends during the humid summer months, cut
them to the same length as the width of the tabletop. During dry
periods, make the ends longer than the width of the table. How much longer
depends on the species and width of the tabletop. See the charts near the
beginning of this seminar for some assistance.
STRATEGY 16: With such projects as a chest of drawers that have web
frames attached to solid-wood chest sides, the web frames cannot restrict
the sides from moving. To accomplish this feat, you need to join the frames
to the sides with sliding dovetail joints like those shown below.
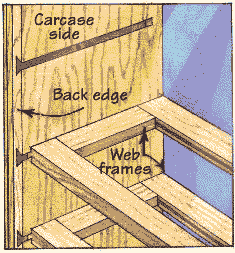
Plan the web frames so they align flush with the front of the carcass.
To do this, you will need to stop the dovetail grooves about 3/8" from
the front of the sides. The dovetail tongues should stop 1/2" short of
the front of the web frames.
To assemble the joint, apply glue to the front 3" of the dovetail groove
only, and slide the web frame into position from the back of the carcase.
There should be 3/8" clearance between the frame and the carcass back.
STRATEGY 17: A sliding dovetail joint also works well for joining table
skirts to legs. See the drawing below.
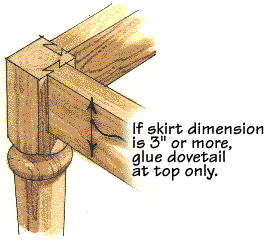
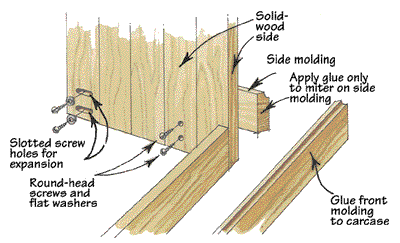
STRATEGY 18: Just as you need to make allowance for solid-wood sides
to move against internal frames, as described in Strategy 16, you also
need to make provisions for the sides to move against external attachments,
such as moldings. To do this, rout 1/2"-long slots into the side, behind
the position where the moldings will be applied as shown below. Then, glue
the front molding to the carcass, and attach the side moldings with screws
and washers that slide freely in the slots as the wood moves. Apply glue
only to the mitered ends of the side moldings.
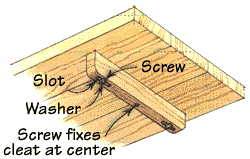
STRATEGY 19: The procedure described in strategy 18 also works for
attaching cleats to solid-wood panels such as a tabletop or chest lid as
shown below. These cleats help reinforce the panel and keep it flat. Similar
to the breadboard end described in Strategy 15, you can permanently fix
the cleat at its center with a screw. This arrangement still allows the
panel to shrink and expand from its center.
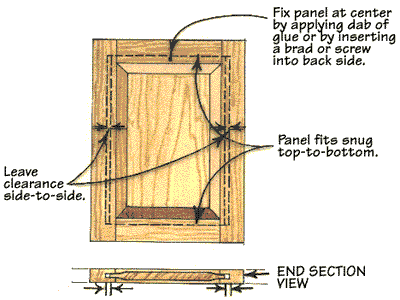
STRATEGY 20: When planning the size of panels that fit within frames,
you need to keep several things in mind. First, allow room for solid-wood
panels to expand widthwise. (Again, refer to the charts for an idea of
how much the panel will expand.) Panels won't expand lengthwise, so fit
them tight in this dimension. Also, keep in mind the points made in Strategy
5 about humidity and dry weather. You'll need to allow extra room if you're
assembling the frame and panel under dry conditions.
Common persimmon (Diospyros virginiana):
Ever tried to taste an immature persimmon? Until ripe, the fruit is high
in tannin and is strongly astringent. You will pucker up when tasting all
but the ripest of fruit. The word persimmon is of Algonquian origin. American
Indians made bread and stored the dried fruit.
Fruit: A plum-like berry that is green before ripening, turning
orange to black when ripe, 3/4 to 2 inches in diameter when ripe.
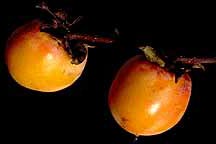
The fruit is astringent when green, sweet and edible when ripe. Matures
September to November with frost.
Twig: Slender, light brown to gray, maybe scabrous or pubescent. Buds
are dark red to black with 2 bud scales, triangular in shape. Leaf scar
has one vascular bundle trace.
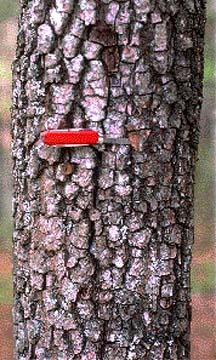
Bark: Very dark, broken up into square scaly thick plates; reminiscent
of charcoal briquettes.
Form: A small to medium-sized tree with a round-topped crown. In forest
stands the stem may be straight, tall, and slender.
Leaf: Alternate, simple, pinnately-veined, 2 1/2 to 5 1/2 inches
long. Oblong to oval, lustrous dark green above, entire margin.
Flower: Usually dioecious, white to greenish-white, male flowers in
3's. Female flowers solitary, both about 1/2 inch long. Present March to
mid-June.
SHOW & TELL
David Whyte: sharpening jig for planer blades
Henry Davis: stationary box project pieces
Tom Gillard: Shelf
Ray Torstenson : Dulcimer
Ted Baldwin: action toys (rabbit, duck, grasshopper)
Loyd Ackerman: Maple bowl from hospital tree.
Manuel Brown: pencil box, cup & ring, goblet
Tim Halbeck: quarter sawn white oak, jewelry box
Don Helton: humming bird shelf from scroll saw.
Phil Bishop: hand carved mantel from Alder.
ROUTER DRAWING

Just a reminder to resister at the meeting for the router drawing.
Remember that the only way you can register is to be at the meeting.

WEB
SITES of INTEREST
Arrowmont
School of Arts and Craft
WOOD
ONLINE newsletter
Falls Mill
Appalachain
Center for the Arts
Forest
Products Lab. 1999 Wood Handbook
Jim DelToro
Highland Hardware
Woodworker's
Journal
Steve
Graham's Page


Saw Blade Sharpening Services: Branching Out is now offering their
services as a drop off spot to have your saw blades sharpened. The
blades will be picked up (Tuesdays), sharpened, and dropped back off at
Branching Out. The Leitz Tooling Systems out of Collierville, TN
will do the sharpening. Call (393-0525) or stop by for details.
Webmaster:
Tom Gillard Jr.

 Vol. 16/ Issue5
May 2001
Editor: Tom Gillard Jr.
![]()
